As a TriNet client, you and your worksite employees are offered the convenience of using Single-Sign
On (SSO) directly from your TriNet account to your TriNet Expense Management account.
When accessing TriNet Expense Management, you will be logged into the account matching the work email address that is setup in your TriNet account.
To access TriNet Expense Management, continue with the instructions below.
- Log in to the TriNet platform (www.TriNet.com).
- Your TriNet account should default to Employee View.
Note: If you have administrative access to TriNet for your company, you may need to change your view to Employee in the upper left corner of your account.
- In the left menu bar, click Money then select Expenses.
To create an expense report, follow the steps below. You will first create individual expenses and then move them on to a report to submit for approval.
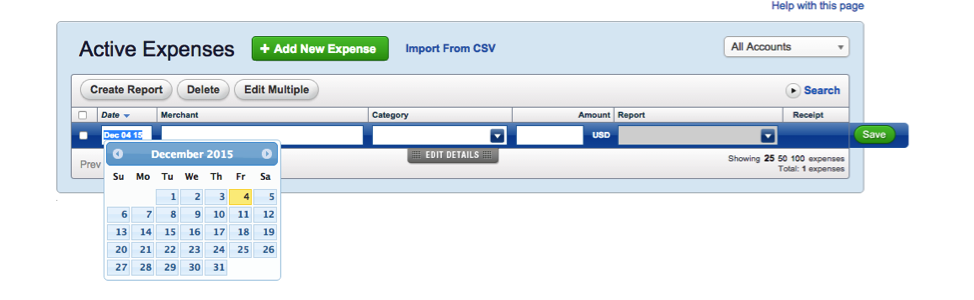
Step 1 – Hover your cursor over the Expenses tab in the top menu bar and then select Active.
Step 2 – Click on the Add New Expense button. Enter a date, merchant, category, amount, and any other fields you deem necessary, or that are required by your Company.
(Note: Under the grey Edit Details tab you can indicate whether the expense is a reimbursable or non-reimbursable expense. By default, all expenses are marked as Reimbursable. Reimbursable = the money needs to be paid to you. Non-reimbursable = the money needs to be paid to an outside vendor (ex. Your credit card company if it is a corporate company card) If you set up the credit card (cc) integration and the cc is marked as company paid, expenses will default to status of non-reimbursable).
Step 3 – Attach a receipt to your expense by clicking on the blue Add link under the Receipt column for that expense line item. You are given the option to select a file from your computer, or to select a receipt that you are saving under the "Your Receipts" tab in TriNet Expense.
Step 4 – Click Save. Repeat Steps 2 and 3 until you are done entering your expenses.
Step 5 - Click the checkbox next to each expense you would like to submit and click Create Report.
Step 6 - Then click on the green Submit button in the upper right-hand area of your report to submit to your approver/manager. **
**Note - If you do not see an email address under the My Approver section / there is not an email address on the "To" line - this indicates you do not have an Approver setup. If you submit the expense report it will route to your Personal Archive folder and not be visible at the Company level. You should contact your company's Expense Admin or HR team to assist.
If you have any questions or need further assistance contact employees@trinet.com.